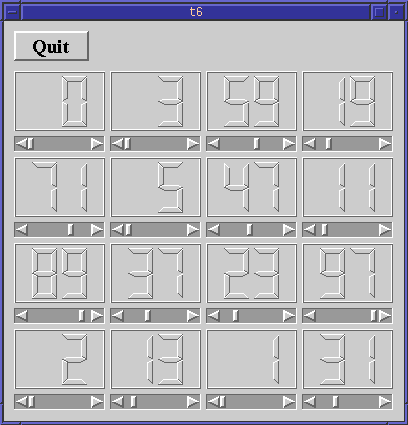

This example shows how to encapsulate two widgets into a new component and how easy it is to use many widgets. For the first time, we use a custom widget as a child widget.
/****************************************************************
**
** Qt tutorial 6
**
****************************************************************/

#include <qapplication.h>
#include <qpushbutton.h>
#include <qscrollbar.h>
#include <qlcdnumber.h>
#include <qfont.h>

class LCDRange : public QWidget
{
public:
    LCDRange( QWidget *parent=0, const char *name=0 );
protected:
    void resizeEvent( QResizeEvent * );
private:
    QScrollBar  *sBar;
    QLCDNumber  *lcd;
};

LCDRange::LCDRange( QWidget *parent, const char *name )
        : QWidget( parent, name )
{
    lcd  = new QLCDNumber( 2, this, "lcd"  );
    lcd->move( 0, 0 );
    sBar = new QScrollBar( 0, 99,                       // range
                           1, 10,                       // line/page steps
                           0,                           // inital value
                           QScrollBar::Horizontal,      // orientation
                           this, "scrollbar" );
    connect( sBar, SIGNAL(valueChanged(int)), lcd, SLOT(display(int)) );
}

void LCDRange::resizeEvent( QResizeEvent * )
{
    sBar->setGeometry( 0, height() - 16, width(), 16 );
    lcd->resize( width(), sBar->y() - 5 );
}

class MyWidget : public QWidget
{
public:
    MyWidget( QWidget *parent=0, const char *name=0 );
protected:
    void resizeEvent( QResizeEvent * );
private:
    QPushButton *quit;
    LCDRange *value[16];
};

MyWidget::MyWidget( QWidget *parent, const char *name )
        : QWidget( parent, name )
{
    setMinimumSize( 200, 300 );

    quit = new QPushButton( "Quit", this, "quit" );
    quit->setGeometry( 10, 10, 75, 30 );
    quit->setFont( QFont( "Times", 18, QFont::Bold ) );

    connect( quit, SIGNAL(clicked()), qApp, SLOT(quit()) );

    for( int i = 0 ; i < 16 ; i++ )
        value[i] = new LCDRange( this );
}

void MyWidget::resizeEvent( QResizeEvent * )
{
    int startx      = 10;
    int starty      = quit->y() + quit->height() + 10;
    int valueWidth  = (width() - startx - 10 - 3*5)/4;
    int valueHeight = (height() - starty - 10 - 3*5)/4;
    for( int i = 0 ; i < 16 ; i++ )
        value[i]->setGeometry( startx + (i%4)*(5+valueWidth),
                               starty + (i/4)*(5+valueHeight),
                               valueWidth, valueHeight );
}

int main( int argc, char **argv )
{
    QApplication a( argc, argv );

    MyWidget w;
    w.setGeometry( 100, 100, 400, 400 );
    a.setMainWidget( &w );
    w.show();
    return a.exec();
}
    class LCDRange : public QWidget
    {
    public:
        LCDRange( QWidget *parent=0, const char *name=0 );
    protected:
        void resizeEvent( QResizeEvent * );
    private:
        QScrollBar  *sBar;
        QLCDNumber  *lcd;
    };
The LCDRange widget is an encapsulation of a QScrollBar and a QLCDNumber, connected together.
    LCDRange::LCDRange( QWidget *parent, const char *name )
            : QWidget( parent, name )
    {
        lcd  = new QLCDNumber( 2, this, "lcd"  );
        lcd->move( 0, 0 );
        sBar = new QScrollBar( 0, 99,                       // range
                               1, 10,                       // line/page steps
                               0,                           // inital value
                               QScrollBar::Horizontal,      // orientation
                               this, "scrollbar" );
        connect( sBar, SIGNAL(valueChanged(int)), lcd, SLOT(display(int)) );
    }
This is essentially lifted straight from the MyWidget constructor in chapter five. The
only difference is that lcd is now placed at coordinate 0,0 (the top
left corner of the LCDRange widget) since we're making a new widget and
don't want a border. If the widget's user wants a border, he/she can make
a border around the LCDRange.
    void LCDRange::resizeEvent( QResizeEvent * )
    {
        sBar->setGeometry( 0, height() - 16, width(), 16 );
        lcd->resize( width(), sBar->y() - 5 );
    }
Since LCDRange doesn't have either a border or quit button, the resize event is simpler than the one in MyWidget.
    private:
        QPushButton *quit;
        LCDRange *value[16];
    };
MyWidget now contains the familiar quit button and an array of 16 LCDRange pointers.
        for( int i = 0 ; i < 16 ; i++ )
            value[i] = new LCDRange( this );
In MyWidget's constructor, we create 16 LCDRanges, all with this as
parent. Remember that these will be deleted by Qt when MyWidget is
destroyed.
    void MyWidget::resizeEvent( QResizeEvent * )
    {
        int startx      = 10;
        int starty      = quit->y() + quit->height() + 10;
        int valueWidth  = (width() - startx - 10 - 3*5)/4;
        int valueHeight = (height() - starty - 10 - 3*5)/4;
        for( int i = 0 ; i < 16 ; i++ )
            value[i]->setGeometry( startx + (i%4)*(5+valueWidth),
                                   starty + (i/4)*(5+valueHeight),
                                   valueWidth, valueHeight );
    }
In the resize event, we calculate and set the geometry of all 16 LCDRanges in a simple for loop.
First we calculate the top left position of the top left LCDRange. We give it a 10 pixel border to the left and a 10 pixel border up to the quit button (see The Coordinate System)
We then calculate the size of each LCDRange. We want a grid of 4x4 widgets with a 10 pixel border to the right and 5 pixels between each one (i.e. 3 borders of 5 pixels in each direction). Note that since we divide by the integer 4, we will get small roundoff errors.
Next, we set each individual geometry in a simple loop. We calculate the position using integer modulo and divide and remember to add 5 for the border between each one.
This program shows how easy it is to use many widgets at a time. Each single one behaves like the scroll bar and LCD number in the previous chapter. Again, the difference lies in the implementation.
Change MyWidget so each LCDRange is guaranteed to be square.
Initialize each scroll bar with a different/random value on startup.
You may now go on to chapter seven.
[Previous tutorial] [Next tutorial] [Main tutorial page]
| Copyright © 1998 Troll Tech | Trademarks | Qt version 1.42
|