
In this example, we introduce painting in a pixmap to remove flickering. We also add a force control.
The CannonField now has a force value in addition to the angle.
        int   angle() const { return ang; }
        int   force() const { return f; }
    public slots:
        void  setAngle( int degrees );
        void  setForce( int newton );
    signals:
        void  angleChanged( int );
        void  forceChanged( int );
The interface to the force follows the same practice as for angle.
    private:
        void  paintCannon( QPainter * );
        QRect cannonRect() const;
We have moved the painting of the cannon to a separate function and have also put the defintion of the cannon's enclosing rectangle in a separate function.
        int ang;
        int f;
    };
The force is stored in the integer f.
#include <qpixmap.h>
We include the QPixmap class definition.
    CannonField::CannonField( QWidget *parent, const char *name )
            : QWidget( parent, name )
    {
        ang = 45;
        f   = 0;
    }
The force (f) is initialized to zero.
    void CannonField::setAngle( int degrees )
    {
        if ( degrees < 5 )
            degrees = 5;
        if ( degrees > 70 )
            degrees = 70;
        if ( ang == degrees )
            return;
        ang = degrees;
        repaint( cannonRect(), FALSE );
        emit angleChanged( ang );
    }
We have made a slight change in the setAngle() function. It repaints only the portion of the widget that contains the cannon. The FALSE argument indicates that the specified rectangle should not be erased before a paint event is sent to the widget.
    void CannonField::setForce( int newton )
    {
        if ( newton < 0 )
            newton = 0;
        if ( f == newton )
            return;
        f = newton;
        emit forceChanged( f );
    }
The implementation of setForce() is quite similar to that of setAngle(). The only difference is that we don't show the force value, hence we don't need to repaint the widget.
    void CannonField::paintEvent( QPaintEvent *e )
    {
        QRect updateR = e->rect();
        QPainter p;

        p.begin( this );
        if ( updateR.intersects( cannonRect() ) )
            paintCannon( &p );
        p.end();
    }
We have now optimized the paint event to repaint only the parts of the widget that need updating. First we fetch the update rectangle parameter from the QPaintEvent. Then we begin painting on this widget. We check if the update rectangle intersects with the cannon rectangle. If it does, we paint the cannon. Note that we pass a pointer to the painter to the paintCannon() function.
const QRect barrel_rect(33, -4, 15, 8);
We have chosen to define the barrel rectangle as a constant.
    void CannonField::paintCannon( QPainter *p )
    {
        QRect    cr = cannonRect();
First we fetch the cannon's enclosing rectangle and store it in cr.
QPixmap pix( cr.size() );
Here we encounter a new class; the QPixmap. QPixmap is an off-screen paint device which is handy for flicker-free painting. Here we create a pixmap with the same size as the cannon. We want to draw the cannon in this pixmap and then move the pixmap to the screen in one operation. This technique is called double-buffering and virtually removes flickering.
QPainter tmp;
We create a temporary painter tmp for drawing in the pixmap.
pix.fill( this, cr.topLeft() );
Upon creation, a pixmap is filled with arbitrary pixels, thus we first fill it with the widget's background. We have to specify the position where the pixmap will be placed in the widget, so that we can cope with any type of background (for instance background pixmaps).
        tmp.begin( &pix );
        tmp.setBrush( blue );
        tmp.setPen( NoPen );
Here we start painting on the pixmap. We set a blue brush and an invisible pen, as in the previous chapter. This time we use a shortcut. setPen() and setBrush() are overloaded functions in QPainter.
        tmp.translate( 0, pix.height() - 1 );
        tmp.drawPie( QRect( -35,-35, 70, 70 ), 0, 90*16 );
        tmp.rotate( -ang );
        tmp.drawRect( barrel_rect );
        tmp.end();
The code that draws the cannon is very similar to the code in the previous example. The only difference is the translation which now is relative to the pixmap height and that we have moved the barrel rectangle into a constant.
p->drawPixmap( cr.topLeft(), pix );
Finally, we call drawPixmap() to zip the pixmap onto the screen in one lightning fast operation.
    QRect CannonField::cannonRect() const
    {
        QRect r( 0, 0, 50, 50 );
        r.moveBottomLeft( rect().bottomLeft() );
        return r;
    }
This function returns the rectangle enclosing the cannon in widget coordinates. First we create a rectangle with the size 50x50, then we set its bottom left corner equal to the widget's bottom left corner.
The rect() function returns the widget's enclosing rectangle in widget coordinates (i.e. the top left corner is 0,0).
    class MyWidget : public QWidget
    {
    public:
        MyWidget( QWidget *parent=0, const char *name=0 );
    protected:
        void resizeEvent( QResizeEvent * );
    private:
        QPushButton *quit;
        LCDRange    *angle;
        LCDRange    *force;
        CannonField *cannonField;
    };
We add a second LCDRange which will be used to set the force.
        force  = new LCDRange( this, "force" );
        force->setRange( 10, 50 );
        force->setGeometry( 10, angle->y() + angle->height() + 10, 75, 130 );
We place the force LCDRange widget below the angle widget and
specify the range to 10..50.
        connect( force,SIGNAL(valueChanged(int)), cannonField,SLOT(setForce(int)));
        connect( cannonField,SIGNAL(forceChanged(int)), force,SLOT(setValue(int)));
We connect the force widget and the cannonField widget just like
we did for the angle widget.
force->setValue( 25 );
We initialize the force value to 25.
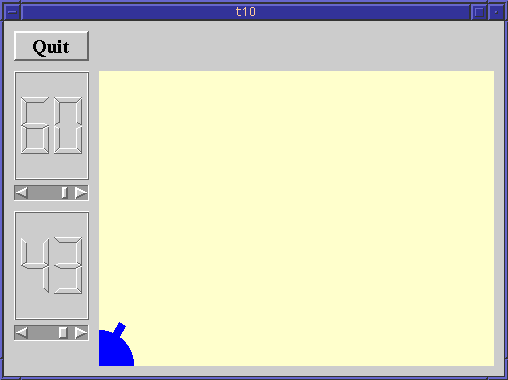
The flicker has gone and we have a force control.
Make the size of the cannon barrel be dependent on the force.
Put the cannon in the bottom right corner.
You may now go on to chapter eleven.
[Previous tutorial] [Next tutorial] [Main tutorial page]
| Copyright © 1998 Troll Tech | Trademarks | Qt version 1.42
|